This guide covers the procedure for the physical installation of most types of retail standalone ATM machines. This installation guide is intended for use by merchants who have purchased an ATM from Prineta and would like to do the installation themselves.
Tools/Equipment Required
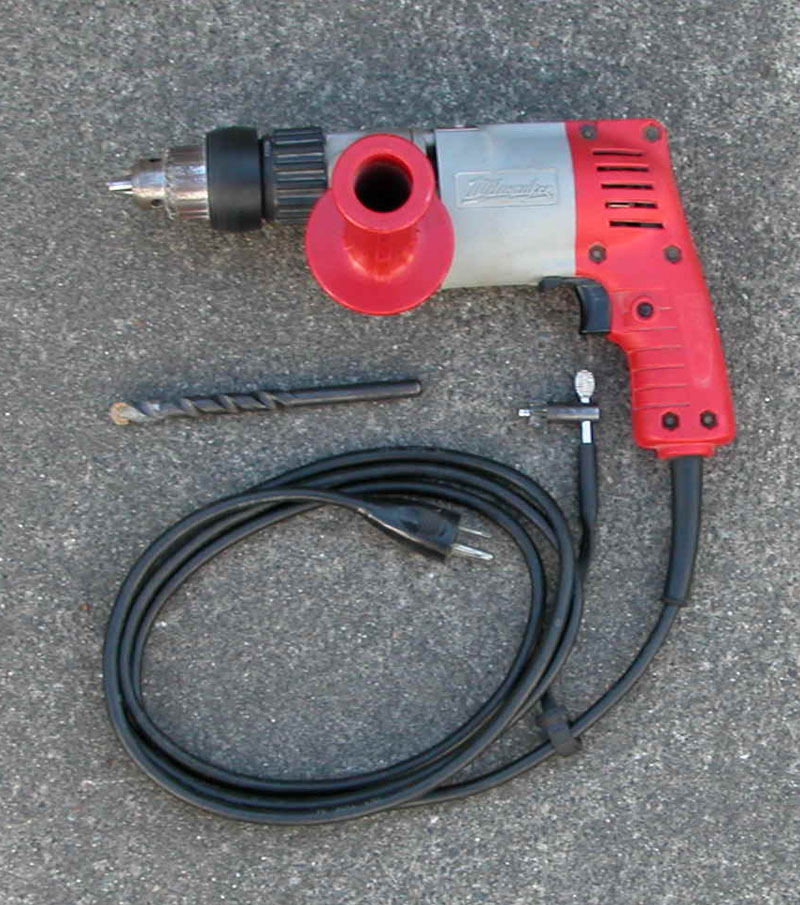
- Heavy-duty electric drill (rotary hammer drill)
- 1/2” (13mm) diameter carbide-tipped masonry drill bit
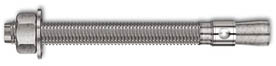
- Four 1/2” x 4 1/2” (or optionally 1/2″ x 5″ or 1/2 x 7″) wedge anchor bolts
- Four 1/2” nuts
- Four 1/2” flat washers
- 3/4” Wrench (Recommended: Box End Ratcheting Wrench)
- Dolly (hand truck)
- Hammer
- Sharpie or felt-tip marker
- Flashlight
- Eye protection
- Broom (or vacuum, blower, etc.)
- Tile drill bit (optional)
- 1/4” (6 mm) diameter carbide-tipped masonry drill bit (optional)
- Extra ½” wedge anchors (optional)
- Extra drill bits (optional)
Choosing a spot for your ATM
Choosing the right location for your ATM is very important. Security concerns suggest a location that is away from any door, large window, or external access point. Ideally, the machine should be installed as close to a back wall as possible. For visibility reasons, it’s often best to position the ATM near the front where your customers can easily locate it. Wherever you decide to place the ATM, there are a few factors you must take into consideration:
Site Wiring
An obvious and essential first step is making sure that there is a standard electrical outlet and proper network communication lines available nearby the spot you want to install the ATM at. Although it is not entirely necessary, it is best if AC power feed will be a dedicated electrical outlet, to which no other electrical devices are connected.
If you are using a dedicated phone line to connect your ATM, ensure that it will be a dedicated line, not regularly used by other connections which will cause interruption.
If you are using a TCP/IP (Internet/Ethernet) connection, ensure that the connection is communicating first by connecting it to a computer. Make sure that there are no security firewalls that would prevent communication with the Host/Processor.
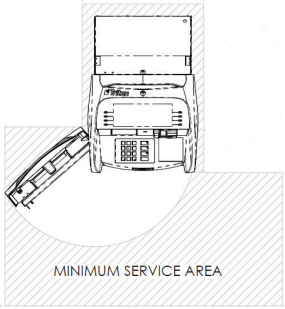
Clearance and Space Requirements
Once you have a spot picked out it is important to make sure that there is enough space around the ATM to ensure it can be easily used, loaded, and operated. Make sure that the fascia (the plastic door used to cover the lower cabinet and lock) and the vault door can swing open far enough so that the cash can be loaded in the cabinet. It is best if the door can swing open 90 degrees. If you’re placing your ATM next to movable objects such as vending machines for example, those machines can be butted up against the ATM, then moved slightly when the ATM door needs to be opened, and moved back when it’s closed.
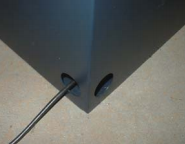
Behind the ATM you will need about an inch of space to get the power cord and wires out.
Wood Cabinet Space Requirements: If you are planning to outfit your ATM with a custom wooden ATM cabinet, be sure to keep the cabinet’s dimensions in mind while you are choosing the spot for your ATM. Sometimes the back of the wood cabinet and the back of the ATM will not be completely flush with each other. Therefore if you place your ATM too close against the wall, the cabinet will stick out a bit in the front of the ATM. To be safe, the ATM should be installed no less than 4″ from wall if using a cabinet. You should also consider the height of the cabinet. If there is something above where the ATM is placed and you position the ATM without the cabinet in mind, it could interfere with the cabinet.
Here are the typical dimensions of a Prineta wooden ATM cabinet
- 24″ Deep
- 18.5″ Wide
- 55″ Tall
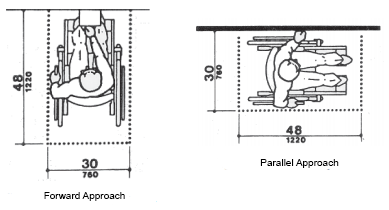
ADA Compliance
It is essential that you make sure the spot you’ve chosen complies with the US Federal Americans with Disabilities Act (ADA). The law requires that all ATMs must be accessible to those in wheelchairs or walkers, who need extra room to maneuver. ADA standards require a 48”x 30” clear space in front of the ATM, it is best to use a measuring tape to be sure. Be sure to check with your local/state government for any additional requirements.

Marking the Holes
Once the site is ready, use the dolly to move the ATM into position. TIP: Now is a good time to make sure that the ATM is in the exact position you, or anyone who needs to approve the ATM’s placement, want it to be in.
Open the cabinet vault door. In the base of the ATM safe there are 4 pre-drilled holes in each corner that are used for mounting. Use a Sharpie marker or any felt-tip pen, and trace these holes onto the floor. Mark the entire hole onto the floor, these marks will serve as guides for the anchor bolt holes that will be drilled in the next step. Once you’ve marked on the floor where all four holes are to be drilled, move the ATM away from it’s spot so it is no longer on top of the four holes. Now on the floor you can see the “bolt pattern”.
Drilling the Holes
Using fewer bolts: While we do not recommend it, some ATM owners choose to only secure the machine with one or two bolts. Many times this is because they don’t want to damage the floor any more than necessary. With one bolt the ATM can move if leaned against or pushed. With two bolts the machine will be unmovable. Sometimes one bolt will be anchored in the floor a lot more strongly than another bolt, so using fewer bolts lowers the strength. For security purposes you should use all four bolts, but the choice is yours.
Concrete/Tile Floors: These instructions will explain how to securely attach the ATM to concrete or tile floors (typically there is concrete underneath the tile). If you need to attach the ATM to hardwood you will need to follow a different process using large screws.
Optional: Drilling Through Tile
If you have a tile floor, you must not attempt to drill through the tile using the concrete drill bit. If you do this you will most likely crack the tile. You will need to use a special 1/2″ carbide tipped glass & tile drill bit
Optional: Drilling Pilot Holes
Sometimes pre-drilling the holes can help make the main drilling easier. Although it is not completely necessary, if you already have the 1/4″ drill bit, it might be worth it. To get started, center-punch each mark to help align the drill bit. Use a rotary hammer drill with a 1/4” (6 mm) diameter carbide-tipped masonry bit to drill four pilot holes at the drilling points that were marked in the previous step. Drill the pilot holes approximately 1/2” (12 mm) deep into the floor. These holes will help guide the masonry bit that will be used to drill the anchor-bolt holes in the next step.
Drilling the Anchor-Bolt Holes
Safety Tip: When drilling be sure to wear safety glasses! Pieces of concrete can go flying and cause injuries. It is also recommended to wear earplugs as the drilling can be very loud.
Use a rotary hammer drill with a 1/2” (13mm) diameter carbide-tipped masonry bit to drill four holes at least 2-3/4” [70mm] deep into the floor. Be sure to take into account the depth of any floor covering, such as tile or vinyl when gauging the depth of the anchor holes. Make sure the holes are drilled at least 2- 3/4” (for a 4” long anchor bolt, deeper for longer anchors) into the concrete floor.
Testing Anchor Bolt Hole Diameter
Ensure the holes drilled are not too large in diameter by test-fitting the ½” anchor bolts by hand. If the anchor bolt “falls” into the hole without being tapped in, the hole is too large! You will need to move the mounting hole pattern and redrill using smaller holes as necessary to achieve a snug fit. It is easier to drill the holes larger now if necessary, than have to move the cabinet and redrill later because they are too big. DO NOT be tempted to hammer/install the anchor bolts now. If you do this it will be VERY difficult to position the ATM on top of the anchors because of the ATM’s weight.
Hammer in the Anchor Bolts
After drilling the holes, the floor is going to be covered in dust and debris from the concrete. Make sure that the location you plan to mount the ATM at is free of all debris that might cause the cabinet to not be level before continuing. Use a broom, vacuum or blower to remove any dirt or dust.in the area. Be careful not to inadvertently sweep too much debris into the mounting holes as this can cause problems.
Move the ATM into position for mounting by aligning the cabinet base holes over the four anchor bolt holes drilled in the previous procedure. You will likely need a flashlight to be able to clearly see if the holes are aligned or not.
Once aligned, place the four ½” anchor bolts through the cabinet base and into the mounting holes.
On each bolt go ahead and place a flat washer followed by a ½” nut before hammering. Sometimes the tips of the anchor bolts can be stripped or damaged during the hammering process making it impossible to fasten the nut to the bolt, therefore it is better to do this step before hammering. Once the washers and nuts are on, use a hammer to pound the bolts firmly into the floor.
Tightening the Nuts
Although you can usually use any type ¾” wrench for this step, we have found that it works best to use a Box End Ratcheting Wrench. Wrenches with sockets are often not deep enough when there is excess bolt remaining and the lack of space inside the ATM cabinet often makes it difficult to use a standard or crescent wrench.

If you’re using a torque wrench, it is recommended the bolts be tightened to 60 foot-pounds to establish the maximum pull-out strength of the anchors. If a torque wrench is not available, do not overtighten. If you overtighten the nuts it will often cause the anchor bolts to spin in the hole.
Post-Installation and Programming
When you’ve finished installing the ATM make sure that the ATM cannot be moved by giving it a good push.
Now that the physical installation of your ATM is completed, the hard part is over. The next step is to connect all the electrical and network cables and program the machine. If you need help programming your machine, contact us and we can have an ATM technician walk you through it over the phone.
If you have purchased an ATM from Prineta, your work is done. There is no need to program it, since our ATMs come pre-programmed. Just connect the power cord, internet or phone cord and load the cash. To learn more about best ATM cash loading practices, see our ATM cash loading guide.
1 thought on “ATM Installation Guide: How to Install an ATM Machine”
Comments are closed.